IOAI 補缺|視覺、語言、音訊(fast.ai 沒教的部分)
物件偵測、影像分割、GAN、自監督、BERT、編碼器-解碼器、預訓練語言模型、Whisper、HuBERT、LoRA 微調。大綱都屬「實作」:會呼叫、會看輸出就夠。
IOAI 補缺|視覺、語言、音訊
這一頁怎麼用
萬用工具:Hugging Face pipeline
| 任務 | pipeline(...) 名稱 | 常用模型 |
|---|---|---|
| 影像分類 | 'image-classification' | google/vit-base-patch16-224 |
| 物件偵測 | 'object-detection' | facebook/detr-resnet-50 |
| 影像分割 | 'image-segmentation' | nvidia/segformer-b0-finetuned-ade-512-512 |
| 圖文零樣本分類(CLIP) | 'zero-shot-image-classification' | openai/clip-vit-base-patch32 |
| 文字分類 | 'text-classification' | distilbert-base-uncased-finetuned-sst-2-english |
| 填空(BERT) | 'fill-mask' | bert-base-uncased |
| 翻譯(編碼器-解碼器) | 'translation' | Helsinki-NLP/opus-mt-en-zh |
| 文字生成(語言模型) | 'text-generation' | Qwen/Qwen2.5-0.5B-Instruct |
| 語音辨識 | 'automatic-speech-recognition' | openai/whisper-small |
| 音訊分類 | 'audio-classification' | superb/hubert-base-superb-ks |
一個套路走天下
🌐 跟著做(要下載模型,Kaggle 開 Internet)
from transformers import pipeline            # 🌐
clf = pipeline('text-classification')        # 不指定模型就用預設
print(clf('This course is amazing!'))        # → [{'label': 'POSITIVE', 'score': 0.9998...}]
§1|物件偵測與影像分割
| 任務 | 輸出 | 代表模型 | 評估指標 |
|---|---|---|---|
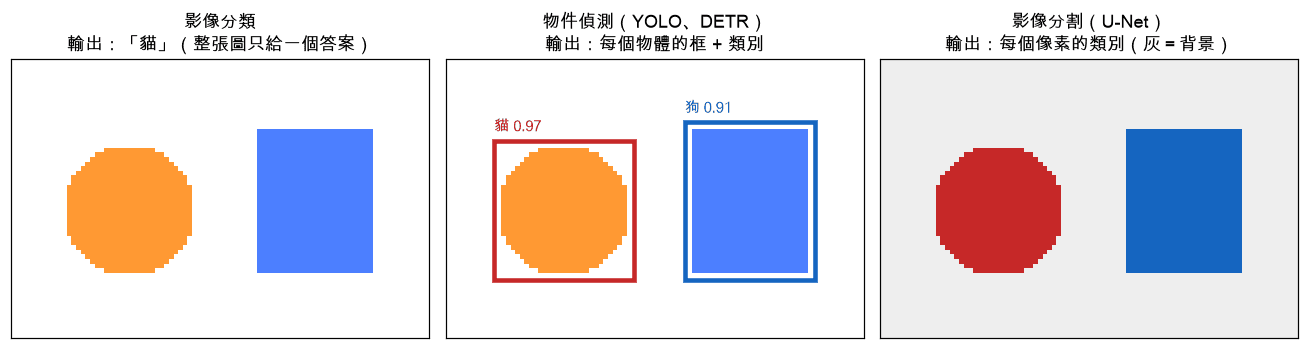
| 影像分類 | 一個類別 | ResNet、ViT(fast.ai L01) | 準確率 |
| 物件偵測 | 很多個(框、類別、信心) | YOLO(快)、SSD、DETR(Transformer) | mAP、IoU |
| 語意分割 | 每個像素一個類別 | U-Net(fast.ai L23 的骨架)、SegFormer | IoU、Dice |
IoU(交集 ÷ 聯集):預測框和正確框重疊多少。IoU ≥ 0.5 通常算偵測正確。
💻 跟著做(不用下載)
def iou(a, b):                               # 💻 框的格式 (x1, y1, x2, y2)
    x1, y1 = max(a[0], b[0]), max(a[1], b[1])
    x2, y2 = min(a[2], b[2]), min(a[3], b[3])
    inter = max(0, x2 - x1) * max(0, y2 - y1)
    area = lambda r: (r[2] - r[0]) * (r[3] - r[1])
    return inter / (area(a) + area(b) - inter)

print(iou((0, 0, 10, 10), (5, 5, 15, 15)))   # → 0.14285714285714285(重疊 25 ÷ 聯集 175)
print(iou((0, 0, 10, 10), (0, 0, 10, 10)))   # → 1.0
🌐 跟著做(要下載模型,Kaggle 開 Internet)
from transformers import pipeline            # 🌐 物件偵測
from PIL import Image
import requests

url = 'http://images.cocodataset.org/val2017/000000039769.jpg'   # 兩隻貓和遙控器
img = Image.open(requests.get(url, stream=True).raw)
det = pipeline('object-detection', model='facebook/detr-resnet-50')
for r in det(img):
    print(r['label'], round(r['score'], 2), r['box'])
YOLO 用 ultralytics 套件,三行就能訓練自己的資料:
🌐 跟著做(要下載模型,Kaggle 開 Internet)
from ultralytics import YOLO                 # 🌐 pip install ultralytics
model = YOLO('yolov8n.pt')                   # n=最小最快
model.train(data='coco8.yaml', epochs=3)     # 換成自己的資料設定檔
results = model('bus.jpg')                   # 預測
§2|GAN 與自監督學習
| 方法 | 一句話 | 學什麼 | 現況 |
|---|---|---|---|
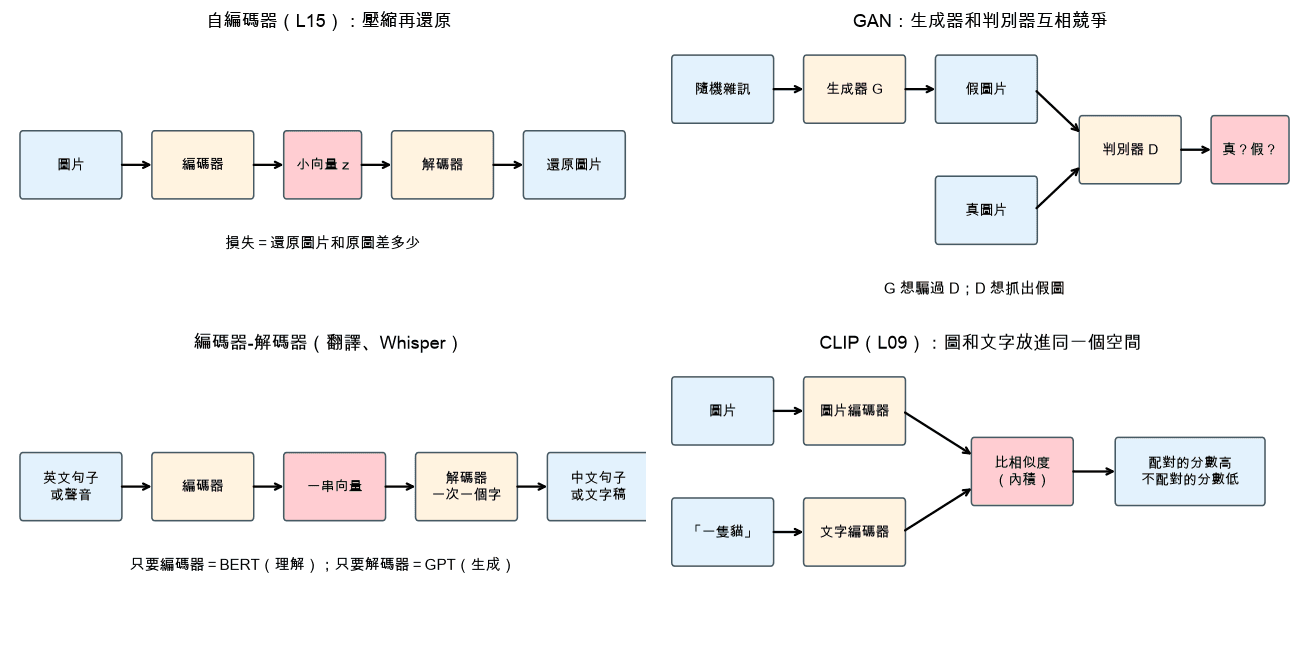
| GAN | 生成器造假,判別器抓假,兩邊一起進步 | 生成圖片 | 生成圖片快,但訓練不穩;多被擴散模型取代 |
| 擴散模型(fast.ai L09–L25) | 學會一步步去雜訊 | 生成圖片 | 目前主流 |
| 自監督學習 | 從資料本身出題,不用人工標註 | 好的特徵 | 預訓練的主流做法 |
自監督的「自己出題」方式:
| 資料 | 題目 | 代表 |
|---|---|---|
| 文字 | 遮住一個字,猜回來 | BERT |
| 文字 | 猜下一個字 | GPT、fast.ai L04 的語言模型 |
| 圖片 | 同一張圖做兩種增強,要學到相近的特徵 | SimCLR、DINO |
| 圖片 | 遮住 75% 的小方塊,畫回來 | MAE |
💻 跟著做(不用下載)
import torch, torch.nn as nn                  # 💻 迷你 GAN:學會產生「平均 4、標準差 1.25」的數字
torch.manual_seed(0)
G = nn.Sequential(nn.Linear(1, 32), nn.ReLU(), nn.Linear(32, 1))                 # 生成器
D = nn.Sequential(nn.Linear(1, 32), nn.ReLU(), nn.Linear(32, 1), nn.Sigmoid())   # 判別器
optG = torch.optim.Adam(G.parameters(), lr=1e-3)
optD = torch.optim.Adam(D.parameters(), lr=1e-3)
bce = nn.BCELoss()
ones, zeros = torch.ones(64, 1), torch.zeros(64, 1)

for step in range(6000):
    real = torch.randn(64, 1) * 1.25 + 4      # 真資料
    fake = G(torch.randn(64, 1))              # 假資料
    # 1. 訓練判別器:真的說 1,假的說 0
    lossD = bce(D(real), ones) + bce(D(fake.detach()), zeros)
    optD.zero_grad(); lossD.backward(); optD.step()
    # 2. 訓練生成器:讓判別器把假的說成 1
    lossG = bce(D(fake), ones)
    optG.zero_grad(); lossG.backward(); optG.step()

sample = G(torch.randn(1000, 1))
print(round(sample.mean().item(), 1), round(sample.std().item(), 1))   # → 3.9 1.1(目標 4 和 1.25)
# 試試把 6000 改成 3000,或 lr 改成 2e-3:結果會差很多。這就是「GAN 訓練不穩定」
§3|BERT、編碼器-解碼器、預訓練語言模型
| 類型 | 代表 | 看得到哪些字 | 擅長 | 例子 |
|---|---|---|---|---|
| 只有編碼器 | BERT、DeBERTa(fast.ai L04) | 前後都看 | 理解:分類、找答案 | 判斷評論正負面 |
| 只有解碼器 | GPT、Qwen、Llama | 只看前面 | 生成:寫字、對話 | 聊天機器人 |
| 編碼器-解碼器 | T5、MarianMT、Whisper | 編碼器前後都看,解碼器只看前面 | 轉換:翻譯、摘要、語音轉文字 | 英翻中 |
🌐 跟著做(要下載模型,Kaggle 開 Internet)
from transformers import pipeline            # 🌐 BERT 填空:看它懂不懂上下文
fill = pipeline('fill-mask', model='bert-base-uncased')
for r in fill('The capital of France is [MASK].')[:3]:
    print(r['token_str'], round(r['score'], 3))           # → paris 排第一
🌐 跟著做(要下載模型,Kaggle 開 Internet)
from transformers import pipeline            # 🌐 編碼器-解碼器:英翻中
tr = pipeline('translation', model='Helsinki-NLP/opus-mt-en-zh')
print(tr('Deep learning is fun.')[0]['translation_text'])
開源 vs API:
| 開源模型(Qwen、Llama) | API(OpenAI、Claude、Gemini) | |
|---|---|---|
| 在哪裡跑 | 自己的 GPU | 別人的伺服器 |
| 能微調嗎 | 能 | 有限 |
| 比賽 | 常見;比賽環境可能不能上網 | 看比賽規定 |
用 BERT 做分類的完整微調流程就是 fast.ai L04 的 notebook,換資料集即可。
§4|音訊:Whisper、HuBERT
| 項目 | 內容 |
|---|---|
| 聲音變數字 | 取樣率 16000 Hz = 每秒 16000 個數字 |
| 常見特徵 | 頻譜圖、梅爾頻譜(把聲音畫成圖,就可以用 CNN) |
| Whisper | 編碼器-解碼器,語音 → 文字,支援中文 |
| HuBERT | 只有編碼器,語音 → 特徵向量,接分類頭做情緒、關鍵字辨識 |
| Qwen-Audio、Voxtral | 聽得懂聲音的大型語言模型,可以問它聲音相關的問題 |
🌐 跟著做(要下載模型,Kaggle 開 Internet)
from transformers import pipeline            # 🌐 Whisper 語音轉文字
asr = pipeline('automatic-speech-recognition', model='openai/whisper-small')
print(asr('my_voice.wav')['text'])           # 換成自己的錄音檔
🌐 跟著做(要下載模型,Kaggle 開 Internet)
import torch                                  # 🌐 HuBERT 當特徵抽取器
from transformers import AutoFeatureExtractor, HubertModel
fe = AutoFeatureExtractor.from_pretrained('facebook/hubert-base-ls960')
model = HubertModel.from_pretrained('facebook/hubert-base-ls960')
wave = torch.randn(16000)                    # 假裝是 1 秒的聲音
inputs = fe(wave.numpy(), sampling_rate=16000, return_tensors='pt')
feat = model(**inputs).last_hidden_state     # 形狀 (1, 49, 768):49 個時間點 × 768 維
print(feat.mean(dim=1).shape)                # 平均成一個 768 維向量,接分類器 → torch.Size([1, 768])
比賽提示
音訊題的套路=預訓練編碼器抽特徵 → 平均池化 → 接一個小分類器(邏輯斯迴歸或 MLP)。
§5|微調:完整微調 vs 參數高效微調(LoRA)
| 方法 | 改哪些參數 | 記憶體 | 何時用 |
|---|---|---|---|
| 只訓練分類頭(linear probe) | 最後一層 | 最少 | 資料很少 |
完整微調(fast.ai L01 fine_tune) | 全部 | 最多 | 模型小、資料多 |
| LoRA(PEFT) | 每層旁邊加兩個小矩陣 A、B,原本的權重凍結 | 很少 | 大模型、GPU 小 |
LoRA 的想法:權重的改變量 ΔW 用兩個瘦長矩陣相乘 B × A 來表示。
| 原本的 W(768×768) | LoRA 的 A(4×768)+ B(768×4) | |
|---|---|---|
| 要訓練的參數 | 589,824 | 6,144(約 1%) |
💻 跟著做(不用下載)
import torch, torch.nn as nn                  # 💻 手寫 LoRA 層
class LoRALinear(nn.Module):
    def __init__(self, base, r=4):
        super().__init__()
        self.base = base
        for p in self.base.parameters(): p.requires_grad = False   # 凍結原本的權重
        self.A = nn.Parameter(torch.randn(r, base.in_features) * 0.01)
        self.B = nn.Parameter(torch.zeros(base.out_features, r))   # B 從 0 開始 → 一開始不改變模型
    def forward(self, x):
        return self.base(x) + x @ self.A.T @ self.B.T

layer = LoRALinear(nn.Linear(768, 768))
train = sum(p.numel() for p in layer.parameters() if p.requires_grad)
total = sum(p.numel() for p in layer.parameters())
print(train, total, f'{train / total:.1%}')  # → 6144 596736 1.0%
實際使用時用 peft 套件:
🌐 跟著做(要下載模型,Kaggle 開 Internet)
from peft import LoraConfig, get_peft_model   # 🌐 pip install peft
from transformers import AutoModelForSequenceClassification
model = AutoModelForSequenceClassification.from_pretrained('bert-base-uncased', num_labels=2)
model = get_peft_model(model, LoraConfig(r=8, target_modules=['query', 'value'], task_type='SEQ_CLS'))
model.print_trainable_parameters()           # 只有約 0.3% 要訓練
自我檢核
- 分類、偵測、分割的輸出各是什麼?
- 手算兩個框的 IoU
- GAN 的兩個網路各自想做什麼?
- BERT、GPT、T5 哪個適合翻譯?為什麼?
- 用 pipeline 做任一個任務並印出結果
- 音訊分類的三步套路
- LoRA 為什麼省記憶體?
